


IoT projects for kids: Control LEDs over Bluetooth using a smartphone and ESP32 Arduino
- Nov 9, 2023
- 3 min read

Introduction
Hi there!! Welcome to Makersgeneration.
In our previous post, we were introduced to the ESP32 IoT development board and explored its hardware features and programming platforms like the Arduino IDE. One of the cool features of the ESP32 board is the onboard Bluetooth and Wi-Fi functionality, which makes it an ideal choice for IoT projects for beginners.
In this post, we will learn how to make use of ESP32 Bluetooth functionality to wirelessly control devices using our mobile phones. We will connect an LED to the ESP32 and then turn it ON/OFF with a mobile app on our phone. Sounds cool right?!! Keep reading.
Without wasting much time, let's get right into it - starting with the materials we will need for this Bluetooth IoT project:
Project requirements
ESP32 board
Micro USB cable
Solderless breadboard
LED
220 ohms resistor
Jumper wires
Android Smartphone
BT Terminal mobile app
Building the circuit
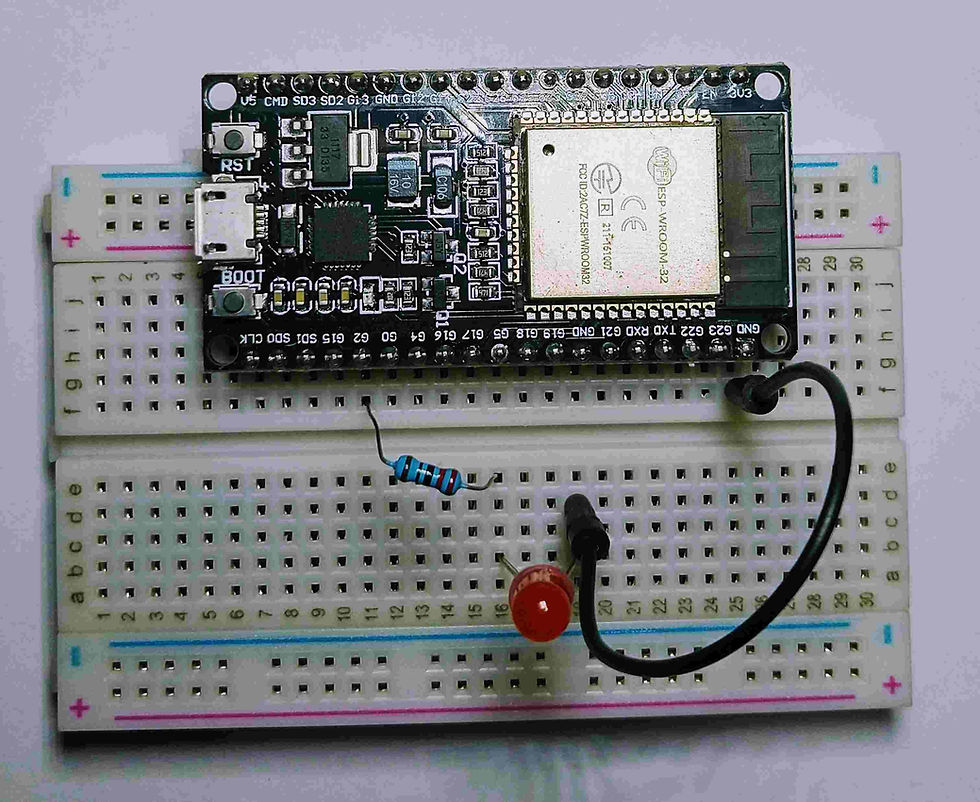
Assemble the ESP32, the LED, and the resistor on the breadboard: with the longer leg of the LED connected to one leg of the resistor, as shown below.
Next, connect the shorter leg of the LED to the GND pin of the ESP32 and the remaining leg of the resistor to pin G2 of the ESP32.

Bluetooth LED control code
Copy the code below and run it in your Arduino IDE.
// Import Bluetooth serial library
#include "BluetoothSerial.h"

#if !defined(CONFIG_BT_ENABLED) || !defined(CONFIG_BLUEDROID_ENABLED)
#error Bluetooth is not enabled! Please run `make menuconfig` to and enable it
#endif

BluetoothSerial SerialBT;

const int LEDpin = 2;    // Initialize LED pin
char blueVal;            // Store value sent from mobile phone

void setup(){
    pinMode(LEDpin, OUTPUT);        // Set LED pin for output signal
    Serial.begin(115200);           // Set baud rate for Serial comm.
    SerialBT.begin("ESP32test");    // Name your device.
    Serial.println("The device started, now you can pair it with bluetooth!");
}

void loop{}{
    // Bluetooth commands from mobile phone
    if (SerialBT.available()){
        blueVal = SerialBT.read();
        Serial.write(blueVal);
    }

    // LED control commands
    if (blueVal == '1'){
        digitalWrite(LEDpin, HIGH);    // Turn on LED
    }
    if (blueVal == '0'){
        digitalWrite(LEDpin, LOW);     // Turn off LED
    }

}
Upload and Run your code
Follow the steps below!
First, make sure your circuit connection is as shown in the schematic provided, and connect your ESP32 to the computer using the micro USB cable.
Go to "Tool" >> "Board" - Select "ESP32 Dev Module" or "ESP32 Wrover Module" and select the right COM Port.

Verify the code, by pressing the mark-like icon, after this upload the code by pressing the forward arrow icon.
BT Terminal Mobile App
BT Terminal is a terminal app with UART serial communication protocol that transmits & receives data wirelessly through Bluetooth connections.
To download mobile App., head to the Google Play store and download the BT Terminal app.

Configure BT Terminal App. to send command
Turn ON Bluetooth on your mobile phone.

Open your phone's Bluetooth setting, search for a new device, and pair with "ESP32test"
Open the BT Terminal App on your phone. You should see the screen below pop up. As can be seen: the status shows "Disconnected" - click on the "Connect" button to connect to a Bluetooth device.
Clicking the "Connect" button will open the screen with a list of paired Bluetooth devices. Select the device you which to connect to (in this case - ESP32test)

Once you select your ESP32 device: the status should now indicate "Connected".
Next, tap on the text bar to enter your command. If you type "1" and then click on the "Send" button, the LED connected to the ESP32 should turn ON. Similarly, if you type in "0" then send the LED should turn OFF.

Alright STEM enthusiasts!! This is where we draw the curtains for today.
You can always check back for more IoT project ideas and how to use ESP32 for other Bluetooth applications!!
Other cute things to make and hand-crafts for kids
If you are looking for more cool Arduino/ESP32 electronics project ideas to do with your kids, take a look at these other activities:
Learn Electronics for Kids: How to install the Arduino IDE software on your computer
Projects Arduino: How to measure the temperature with an Arduino board and a temperature sensor
Fun things to do indoors: How to make a Cartesian diver with a bottle of water
Electronics projects for kids: How to create an Arduino timer with a seven-segment display
Newsletter, follow, subscribe, and like the social media
If you like online STEM activities, consider subscribing to the newsletter and social media for updates, and don't miss any STEM events. Don't forget to subscribe to the newsletter at the bottom of our website ''www.makersgeneration.net'' for more events, tutorials, and freebies.
Subscribe to the Facebook group if you have yet registered. Content and tutorials are shared daily: Create and build STEM projects for kids
We can be reached at: contact@makersgeneration.net if any questions.
See you on soon.


Comments