


How to control a DC motor with an Arduino Uno board and a transistor
- Dec 27, 2017
- 3 min read
Hey guys,
How you doing good?.
happy to see you for this new tech tutorial.
You want to create a new project like a robot with wheels. And to do so, you need to control DC motors since it works with wheels. lol.
To do so, We are starting a serie of tutorials about DC motors. How to control: the direction, the speed, with a transistor, etc. Those tutorials can help you create 2 wheeled robots, close a door, etc.

DC motors Arduino and transistor
Today, we'll see in details how to control a DC motor with a Arduino board( It could be arduino Uno, Arduino Mega, Nano and so one) and a transistor.
Why a transistor? A small 6V DC motor can pull can drain up to 250 mA when loaded. Working with an arduino uno board, the pins on them can furnish only 40 mA max. So we need to amplify the current.
To do so, we need to use a transistor with the arduino uno. One very famous transistor is the PNP 2N2222 that can furnish up to 800 mA on it's collector and has a amplification that can reach 300 ''hfe''.

Materiels
The materiels needed for to make this project is the following:
1 arduino uno board
one 6V battery for the motor's power supply
Jumper wires
1 diode to protect our transistor against high voltage created by the motor when the power supply is turned off
one 6V or 3V DC motor
1 prototyping board (breadboard)
one 220 ohm resistor (on the basis of the transistor)
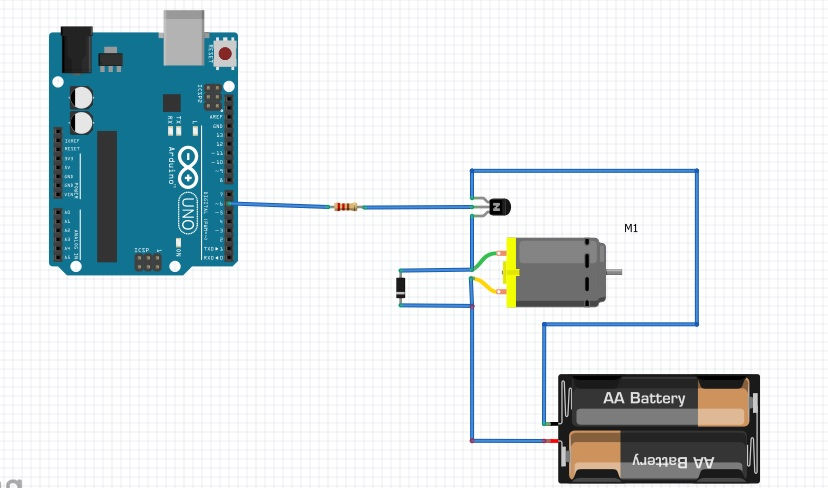
Schematic
We then need to plug the all the materiels and the components as the following schematic.
Be carefull when you plug the transistor's pins to the rest of the schematic (basis, emetter and the collector). Please check the detailed picture I add for you to have a better idea.
The pin number 6 on our arduino(signal that controls motor) is connected to our transistor. The transistor amplifies the current which is necessary to control our DC motor.
Program the arduino board
The following program will be upload to the arduino uno with the Arduino IDE that you can dowload with their website (arduino.cc).

We use the function "analogWrite(a, b)" which control the speed of our DC motor. It can vary between zero and it's max speed.
In "analogWrite(a,b)", "a" represents the pin on the arduino board and "b" the speed for the motor. It can vary between o and 255. Zero being the motor stopped and 255 the full speed for the motor.
For our arduino code, we'll set the value for "b" at 128 which is the middle speed for our motor.
Delay(5000) means to wait 5 seconds, then with analogWrite(Signal_motor, 256) to set the DC motor speed at it's max. We can pursue with another waiting of 5 seconds and start the voild loop again.
Program
int Signal_motor = 6;
void setup()
{
pinMode(Signal_motor, OUTPUT);
Serial.begin(9600);
}
void loop()
{
analogWrite(Signal_motor, 128);
delay(5000);
analogWrite(Signal_motor, 255);
delay(5000);
}
Next step
After testing the schematic, we can improve the schematic by adding a potentiometer to change the speed of the motor or type a value with the arduino terminal with your keyword. Your imagination is the only limit. ;-)
This is the end of this tutorial but not the serie on DC motors and Arduino boards, stay tuned for the next turorials that should published on the website in 2 or 3 days maximum. To stay tuned to our last tutorials, news, articles, coupons and more, you can subscribe to our newsletter on the website footpage ''makersgeneraton.net'' or our social medias (Facebook, Twitter, Google+, Instagram and Youtube).
See you soon for our next article and Merry christmas. ;-)


Comments